|
This tutorial will work with almost any
image I decided to use a cartoon doll as they seem popular. This tutorial is
written for PSP7 but can be used in any version. There are no extra
needed tools other the PSP and Animation Shop that comes with the PSP
Program.
First thing to do Open a doll image
if you want this image transparent do so before starting this procedure.
Ready? Set. GO!
|
|
With the image open increase the
viewing area so that you can see the individual pixels (see image to
right)
|
 |
|
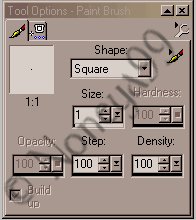
grab your color dropper and choose
one of the colors of the eyeshadow that the doll is wearing click it and
it now becomes your foreground color. go to your paintbrush and with the
settings (see image to the right) fill in the eye area. |
 |
|
Now grab your color dropper again
and click on the black color in the other eye set this as your
foreground color. back to you paintbrush with the same settings as
above and fill in the bottom line of the eye (the one we are making to
blink). (see image to the right)
|
 |
|
Save image with a new name in gif
format. I used blink2. If your original image is not already a gif image
open it again and choose save as name it something different (I chose
blink1) and save with the gif format.
Now open animation shop I am using
Version 3.04 Go to file/animation wizard. in the first pop up click same
size as first image frame then next. Now choose transparent and next.
in the next window pick centered and with canvas color and next. In the
following window click repeat animation indefinitely (you can leave the
speed 15 for now we can adjust later) click next. in the last window is
where you will add your images. click the button named add image sift
thru your folders till you find your 2 files that you created (mine were
blink1 and blink2) you can hold in the ctrl key to open multiple files
at the same time. once you have them all click open. Now your files are
listed in the white text box. if they are out of sequence click on the
first image (mine was blink1) and click move up this will move the file
up one spot so that it will be the first frame. when you have your files
where they need to be click Next then Finish.
(see image)
|
|
Now you have your frames first
thing I do is go to view then animation and see how fast the eyes are
blinking. in this case they are blinking way to fast looks like she has
an epilepsy problem..lol.. j/k .. anyways click on the first frame so
that you have a blue line around it (see image)
|
|
now go to animation/frame
properties and there you can increase the duration of the frame speed.
the higher the number the slower the frame is (or the longer the frame
is seen) you will have to play around with this I ended up with 35 now
view the animation again by clicking View/animation for mine images it
still doesn't look right so I exit off that and click on frame 2 to make
it the active image and again go to animation /frame properties and
increase the number. Mine I set at 60. Be sure to view the animation and
play with the numbers until you get what you think looks best for your
particular image. once satisfied go to save as and name the file (I
named mine blinkdoll) keep the gif format and hit save ( I have mine set
with default and to use them every time if this is your first time
saving an image or you haven't selected to save files the same way you
will need to select the options that you see fit for the image.
|
|
 |