For this tutorial you will need:
Supplies
here
Xeroset 1
here
Simple Filter
here
Eye Candy 4000
here
PSP 30 day trial version
here
Ulead Effects Art Texture
here
Fantastic Machines Paint Engine
here
Extract the md_pre_ff.pbv preset to your PSP-presets folder.
Extract the md_ff_ec preset to Eye Candy 4000 - Corona folder.
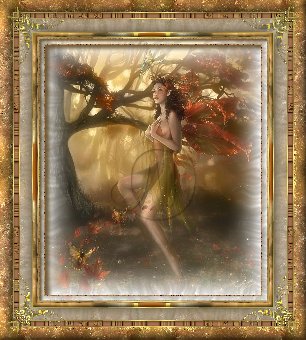
1. Open an image of your choice or use mine.
2. Selections - Select all. Effects - 3D Effects - Inner
Bevel: md_pre_ff preset.
3. Set your background color to white. Image - Add borders
- Symmetric: 2. Select the border with your magic wand.
Effects - Plug-Ins Filters - Ulead Effects Art Texture:
Palette 30, Pattern sample 3, Pattern template 1.
4. Effects - Plug-Ins Filters - Eye Candy 4000 - Corona:
default settings.
5. Selections - Invert. Effects - Plug-Ins Filters - Xero -
Mistifier (default settings).
6. Effects - Plug-Ins Filters - Eye Candy 4000 - Cutout -
Matte Cut, color #4C3811.
7. Image - Add borders - Symmetric: 5. Select the border with
your magic wand. Effects - Plug-Ins Filters - Ulead Effects
Art Texture: Palette 5, Pattern sample 3.
8. Repeat step 3 except use Pattern template 2.
9. Choose a color of your image and set it as your
background color. Mine is #984F13. Image - Add borders -
Symmetric: 15. Select the border with your magic wand.
10. Effects - Plug-Ins Filters - Simple - Centre Tile.
11. Effects - Reflection Effects - Rotating Mirror, using
these settings:

12. Effects - Plug-Ins Filters - Simple - 4 Way Average.
13. Effects - Plug-Ins Filters - Xero - Mistifier (default
settings).
14. Effects - 3D Effects - Inner Bevel: md_ff_pre preset.
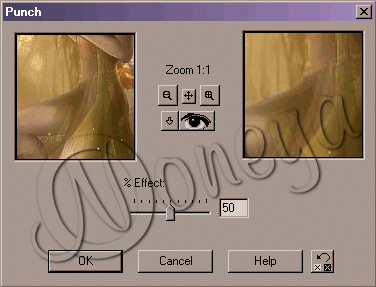
15. Selections - Select all - Selections - Modify - Contract
by 22 - Selections - Invert. Effects - Geometric Effects -
Punch, with these settings:
16. Background color white. Image - Add borders - Symmetric:
2. Select the border with your magic wand. Effects -
Plug-Ins Filters - Ulead Effects Art Texture: Palette 5,
Pattern sample 3.
17. Background color #984F13 or the color you chose in
step 9. Image - Add borders - Symmetric: 25. Select the
border with your magic wand.
18. Repeat steps 10, 11, 12 and 13.
19. Effects - Plug-Ins Filters - Fantastic Machines - Paint
Engine - Intensity1.
20. Selections - Invert. Repeat step 4.
21. Effects - 3D Effects - Drop Shadow: Vertical and
Horizontal 3, Opacity 90, Blur 50, color #4C3811. Repeat
Drop Shadow changing Vertical and Horizontal to -3.
22. Repeat step 16.
23. Image - Add borders - Symmetric - 10. Select the border
with your magic wand. Effects - Plug-Ins Filters - Ulead
Effects Art Texture: Palette 30, Pattern sample 3, Pattern
template 1.
24. Repeat step 6.
25. Repeat step 16.
26. Repeat steps 17, 18 & 19.
27. Repeat step 14.
If you want to add corners:
1. Open the md_ff_corn.psp file provided
in the supplies zip file. Edit - Copy. On your main image: Edit -
Paste - As a new layer. Place the corner with your mover
tool.
2. Effects - Plug-Ins Filters - Ulead Effects Art Texture:
Palette 5, Pattern sample 3, Pattern template 1.
3. Effects - 3D Effects - Drop Shadow: Vertical and
Horizontal 0, Opacity 90, Blur 3, colour black.
4. Layers - Duplicate - Image - Mirror.
5. Layers - Duplicate - Image - Flip.
6. Layers - Duplicate - Image - Mirror.
You are done. I hope you have enjoyed this tutorial.