For this tutorial you will need:
PSP8. Download a trial version
here
Supplies
here
Extract the md_lord.PspGradient
to My Documents/My Psp8 Files/Gradients Folder.
PSP7 users: Extract the md_lord.jgd file to your PSP
Gradients folder.
Extract the md_lord_temp.pspimage file to a folder
of your choice.
Extract the LordFiddle.psp to a folder
of your choice.
Extract the font to the folder where you put your fonts.
Note: When you open the file md_lord_temp.pspimage,
won't see images, this file contains the selections that
we will begin to use.
Remember to save often.
1. Open the md_lord_temp.pspimage
provided. Shift + D to make a copy and close the original.
Flood fill with the cmv_068v001 gradient, Style Linear,
Angle 0, Repeats 0, Invert unchecked. Name this layer:
"1".
2. Open the
LordFiddle.psp. Edit - Copy (Ctrl + C).
On your working area: Edit - Paste - Paste As New Layer
(Ctrl + L). Rename it: "2". Adjust - Blur - Gaussian Blur
- Radius 30.
3. Effects - Texture Effects - Texture,
with these settings: color is #caa689
Place the image to the right with the Move Tool.
Layers - Duplicate. Name the duplicated layer: "3". Image
- Mirror.
4. Add a new layer and name it "4".
Selections - Load / Save Selection - Load Selection From
Alpha Channel -
Selection #1. Flood fill with the same gradient used in
step 2, same settings as before. Effects - Plugins -
Flaming Pear - Super Blade Pro - clear glass.q5q.
Selections - Select None (Ctrl + D). Effects - 3D Effects
-
Drop Shadow: Vertical and Horizontal 3, Opacity 50, Blur
3, Color Black.
5. Add a new layer. Name it "5".
Selections - Load / Save Selection - Load Selection From
Alpha Channel -
Selection #2. Flood fill with #6A3D34. Deselect (Ctrl +
D). Repeat the same Drop Shadow.
6. Hide all layers except "4" and "5".
Layers - Merge - Merge Visible.
7. Layers - Duplicate. Image - Mirror.
8. Activate the
LordFiddle.psp. Edit - Copy (Ctrl + C).
On the working area: Edit - Paste - Paste As New Layer.
Effects -
3D Effects - Drop Shadow: Vertical 0, Horizontal -30,
Opacity40, Blur 25, Color #F2D6A3.
9. Set your Foreground to Gradient and
locate gold, Style Linear, Angle 45, Repeats 0, Invert
unchecked. Set
your Background to Gradient and locate cmv_068v001, Style
Linear, Angle 0, Repeats 0, Invert unchecked. Add
a new vector layer. Grab the Text Tool, with these
settings:

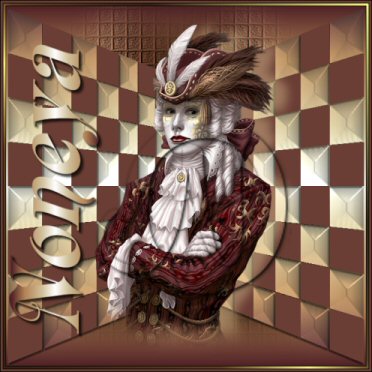
Type your text and place it. Image -
Rotate (Ctrl + R) - 90 Degrees - Left (all layers
unchecked). Objects - Align
- Vert. Center in Canvas.
Layers - Convert to Raster layer.
Effects - 3D Effects - Drop Shadow: Vertical and
Horizontal 3, Opacity 50,
Blur 3, Color Black. Merge Visible.
10. Image - Add Borders - 1 pixel,
Symmetric checked, color black.
11. Image - Add Borders - 4 pixels,
Symmetric checked, color white. Click on the border with
the Magic Wand, same settings as before, and Flood Fill
with the gold. Select None.
12. Image - Add Borders - 1 pixel,
Symmetric checked, color black.
13. Image - Add Borders - 4 pixels,
Symmetric checked, color white. Click on the border with
the Magic Wand, same settings as before, and Flood Fill
with Color #6A3D34. Select None.
14. Image - Add Borders - 1 pixel,
Symmetric checked, color black.
You are done. I hope you have enjoyed this tutorial.