Extract the md_music_grad.PspGradient
to your Gradients Folder.
1. Open a new image 600 x 600 pixels,
transparent background.2.
Set your Foreground to Gradient and locate md_music_grad,
Style Linear 0, Angle 45, Repeats 0, Invert unchecked.
Flood fill with the gradient. Name this layer: "1".
3. Add a new layer, Name it "2".
Set your Foreground Color #F5F3EA. Flood fill with Color.
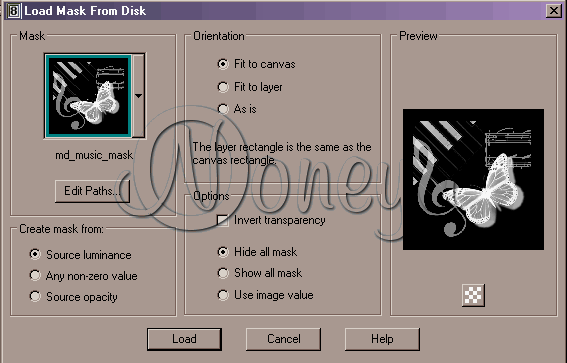
4. Layers, Load /Save Mask, Load
Mask from Disk, Load:
Layers, Delete. Layers - Merge -
Merge Group.
5. Effects - 3D Effects - Drop
Shadow: Vertical 3, Horizontal -3, Opacity 70, Blur 4,
Color #808080. Place with the Move Tool:

7. Adjust, Blur, Gaussian Blur,
Radius: 40.8. Selections,
Ctrl. + A (Select All) - Ctrl. + F (Float) - Ctrl. Shift
+ F (Defloat).
9. Effects - Plugins - Xero -
Fritillary - Settings:

10. Layers - Arrange - Move Down.
Select None.
11. Highlight the top layer. Open
the crisortega.psp file provided,
Ctrl. + C (Copy), On your working area, Ctrl + L (Edit -
Paste - Paste As New Layer). Place with the Move Tool, On
the Layer Palette, Set Opacity to 24 %. Name it "4". Merge
Visible.
12. Set your Foreground to
Gradient and locate a gold gradient, Style Linear 0, Angle 0,
Repeats 0, Invert unchecked. Set your Background to
Gradient and locate md_music_grad, Style Linear 0, Angle 0,
Repeats 0, Invert unchecked. Text Tool with these
settings:

Type your text and place it. When
you are satisfied with your result, convert to Raster
Layer. Effects - 3D Effects - Drop Shadow: Vertical 3,
Horizontal -3, Opacity 70, Blur 4, Color #404040.
13. Merge Visible - Resize your
image to 468x468 Pixels, Image - Add Borders - 1 pixel,
Symmetric checked, color black.
14. Image - Add Borders - 3 pixel,
Symmetric checked, color white. Click on the border with
the Magic Wand (Tolerance and Feather 0, Inside checked)
and Flood Fill with a gold gradient, angle 45 -
Repeats 1 - Invert unchecked. Select None.
15. Image - Add Borders - 1 pixel,
Symmetric checked, color black.
16. Image - Add Borders - 10
pixel, Symmetric checked, color white. Click on the border
with the Magic Wand and Flood Fill with the md_music_grad
gradient,
angle 135 - Repeats 1 - Invert unchecked. Select None.
17. Repeat step 15.
18. Repeat step 14.
19. Repeat step 15
I hope you have enjoyed this
tutorial.