|

For this tutorial you will need:
PSP 30 day trial version
here
Flaming Pear's Designer Sextet - Silver 1.0 demo version
here
Simple Filter
here
Ulead Art Texture
here
FM Tile Tools
here
Eye Candy 4000
here
Supplies
here
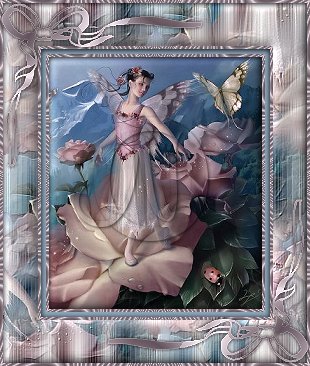
1. Open the image. Shift + D twice to make two copies and
close the original.
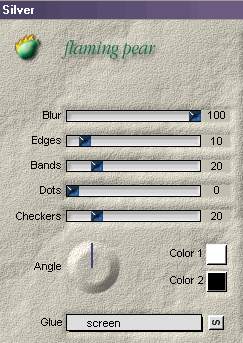
2. On the first copy: Effects - Plug-Ins - Flaming Pear -
Silver using these settings:
3. Effects - Plug-Ins - Simple - Quick Tile.
4. Effects - Plug-Ins - FM Tile Tools - Blend Emboss using
the default settings.
5. Right click on the layer palette and promote to layer.
Minimize this copy.
6. On the second copy: Image - Resize to 70% as bicubic
resample..
7. Selections - Select all. Effects - 3D effects - Inner
Bevel with these settings:
Bevel: Round
Width: 6
Smoothness: 42
Depth: 2
Ambience: 2
Shininess: 9
Light Colour: white
Angle: 315
Intensity: 66
Elevation: 22
8. Set your background color to white. Image - Add borders -
3 - Symmetric checked. Select it with your magic wand.
9. Effects - Plug-Ins - Ulead Art Texture. Edit - Palette 5.
Pattern sample - the third one.
10. Choose a color from the image and set it as foreground
color. I used #63545D. Change your flood fill options as the
following screen shot:
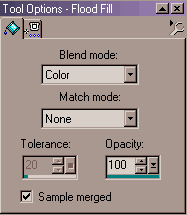
Flood fill the border.
11. Selections - Invert. Effects - Plug-Ins Filters - Eye
Candy 4000 - Cutout - Matte Cut, color black. Deselect.
12. Choose another color of the image and set it as
background color. I used #8CA6BA. Image - Add borders - 5 -
Symetric checked.
13. Repeat steps 8, 9, 10 and 11.
14. Edit - Copy. Edit - Paste as a new layer on the first
copy.
15. Selections - Select all - Selections - Float. Highlight
layer 1 and hit delete. Deselect. Effects - 3D Effects -
Inner Bevel using the same settings as in step 7.
16. Layers - Merge - Merge all (flatten).
17. Set your background to a color that's not in your image.
I used #FF00FF. Image - Add borders - 3 - Symetric checked.
Select it with your magic wand. Flood fill with white.
18. Repeat steps 9, 10 and 11.
19. Open the Corner.psp file provided with this tutorial.
Edit - Copy. Go to your framed image: Edit - Paste as a new
layer. Place the corner using your mover tool. Effects - 3D
Effects - Drop shadow: Vertical and Horizontal 0, Opacity
100, Blur
4.9, color black. Sharpen - Sharpen
20. Layers - Duplicate. Image - Flip - Image - Mirror.
21. Layers - Merge - Merge all (flatten).
I hope you have enjoyed this tutorial.
All info on this page and
contained in this tutorial was created solely by Noneya99
and therefore is the sole property of Noneya99 it is not to
be included in any other tutorials unless written permission
is obtained. Any likeness to another tutorial is purely
coincidental. If you would like to include or display
this tutorial please
email Noneya99
with your request be sure to include what type of site and
site address it will be displayed on.
|