|

For this tutorial you will need:
PSP 30 day trial version
here
Supplies
here
Greg's Factory Output Vol. II
here
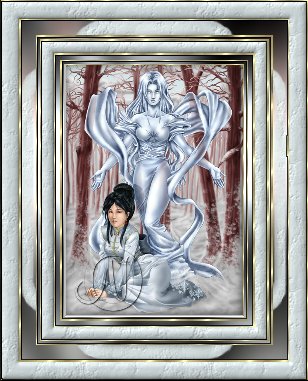
An image of your choice
Remember to save often.
1. Open your image. Shift + D TWICE to make two copies and
close the original. Minimize one copy.
2. Selections - Select all - Selections - Save to alpha
channel. Rename and save your selection as image.
Deselect.
3. Set your background color to white.
4. Image - Add borders - Symmetric - 3. Select the border
with your magic wand.
5. Open the pattern fills provided with this tutorial and
minimize them. Set your Foreground to Pattern.
6. Flood fill with the md_winter_gold pattern (scale 100, angle
0). Selections - Modify - Contract by 1. Effects - 3D
Effects - Chisel using these settings:
Deselect.
7. Selections - Load from alpha channel - image. Effects -
3D Effects - Cutout: Vertical and Horizontal 2, Opacity
65, Blur 27.5, color black. Repeat the cutout changing the
offsets to -2 (minus 2). Deselect.
8. Choose a color of your image and set it as your
background color. I chose #BBC3CC. Image - Add borders -
Symmetric - 5. Select the border with your magic wand.
9. Effects - Plug-Ins Filters - Greg's Factory Output Vol.
II - Pool Shadow (default settings). Deselect.
10. Set your background to any color that's not in the
last border. I used red. Repeat steps 4 and 6.
11. Set your background color to the color you chose in
step 8. Image - Add borders - Symmetric - 10. Select the
border with your magic wand.
12. Repeat step 9.
13. Repeat step 10.
14. Background color: white. Image - Add borders -
Symmetric - 25. Select the border with your magic wand.
Flood fill with the md_winter_snow pattern. Do not deselect.
15. Effects - 3D Effects - Inner Bevel: md_pre_winter preset.
Deselect.
16. Repeat steps 3, 4 and 6.
17. Repeat steps 8 and 9.
18. Repeat step 10.
19. Set your background color to white. Image - Add
borders - Symmetric - 30. Select the border with your
magic wand. Activate the second copy of your image. Edit -
Copy.
20. On your working image: Edit - Paste - Into selection.
Effects - Blur - Gaussian Blur - Radius 30. Do not
deselect.
21. Effects - Plug-Ins Filters - Greg's Factory Output
Vol. II - Pool Shadow (default settings). Do not deselect.
22. Add a new layer. Set your Foreground to Pattern and
flood fill with the snow3256 pattern.
23. Masks - Load from disk - md_winter_mask.msk. Masks -
Delete. Answer yes to the question that pops up. Deselect.
24. Effects - 3D Effects - Drop Shadow: Vertical and
Horizontal 3, Opacity 50, Blur 12.3, color black. Repeat
the drop shadow changing the offsets to -3 (minus 3).
Layers - Merge - Merge all (flatten).
25. Repeat steps 3, 4 and 6.
26. Image - Add borders - Symmetric - 35. Select the
border with your magic wand. Flood fill with the
Md_winter_snow
pattern. Do not deselect.
27. Effects - 3D Effects - Inner Bevel: md_pre_winter preset.
Deselect.
28. Repeat steps 3, 4 and 6. Resize your image if needed
and you are done.
If you would like to use this frame with other images,
please follow these steps:
1. Shift + D to make a copy of your framed image.
2. Go to your Layer Palette. Right click and choose
Promote to layer.
3. Selections - Load from alpha channel - image.
4. Hit Delete.
5. File - Save as... (browse to your PSP frames folder) -
the_name_of_your_choice.pfr.
I hope you have enjoyed this tutorial.
All info on this page and
contained in this tutorial was created solely by Noneya99
and therefore is the sole property of Noneya99 it is not to
be included in any other tutorials unless written permission
is obtained. Any likeness to another tutorial is purely
coincidental. If you would like to include or display
this tutorial please
email Noneya99
with your request be sure to include what type of site and
site address it will be displayed on.
|